

Dear AAPAAN
How can I make my own face shield to protect me from CoVid19?
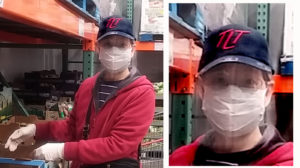
Actually no one asked me that question, but I have something that I wanted to share. It’s a simple way to make a face shield from material which you may already have at your home. We stayed at home as much as possible, but after awhile we have to go and buy food. To limit and control our exposure to the virus, here we are at Costco with latex gloves, mask and a face shield.
All the medical advice I’ve seen said the best way to protect yourself from a Coronavirus infection is to wash your hands often and don’t touch your face. Apparently, the most likely way of getting the virus is touching a surface that has the virus on it and then touching your eyes, nose or mouth. Even with gloves, mask and shield, we sanitize our hands in the car and then scrub them again immediately after getting home. A less probable way to get infected is breathing in virus laden water droplets from a sneeze or a cough. That’s where the mask comes in. The mask also helps protect others in case you are infected (but don’t know) and you sneeze or cough. A further level of protection is to have a solid barrier against air borne water droplets and that’s using a face shield. That’s why retail cashiers work behind a Plexiglas shield and wear masks. Wearing a face shield also prevents you from casually touching your face without thinking.
Since masks and face shields are generally not available, many DIYers are making their own. I’ve seen a lot of videos on how to make masks. In fact, a lot of us are making them and donating them to those who need them. I have not seen much on making face shields.
Here’s my simple face shield for DIYers. It’s light, comfortable and far enough from your face to not fog up or restrict your breathing.
Several friends saw it and decided to make their own. The best complement was that she would wear it because it doesn’t look “dorky”.
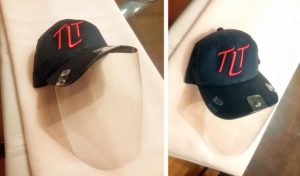
To make it, I start with a baseball cap. Use one you don’t mind destroying if you mess up. Then find a sheet of clear plastic. I had a flat sheet that I cut from a box that housed an external hard drive I bought recently. My sheet was about 9 inches square. As you can see in the pictures, the shield was attached to the cap’s bill with 3 tabs that were stapled on. Cut a center tab first (my was about 2 x 2 inches). Use a staple gun to attach this tab to the center of the bill. Unfortunately, you’ll not be able to use an office stapler. Its staples will be too short and too weak to penetrate the sheet and the cap’s bill. Next you wrap one side of the sheet around the bill and mark the bill’s curvature onto the sheet. I used a Sharpie. Mark a tab at the end. Do the same on the other side. Cut the two tabs and the curvatures you just marked. Use the staple gun to attached the two tabs. Lastly, I rounded out the two corners at the bottom with a scissor.
Since I made my first model, I make a detachable shield model which I donated to health care workers. They wanted detachable shields because they wanted to be able to wash the hats. For this model, I drilled holes instead of using the staples. The tabs were then held in place with twisty ties.
Stay safe. Wash your hands and avoid touching your face.
Wee